v2.0
![]()
v2.0
How I Do It
Granted, I'm not much of an artist. I draw because I enjoy it, not because I feel I'm any good at it. I draw My Little Ponies because I like to bring them to life, and I do not believe the Hasbro executives did them any justice, and because, heck, I enjoy it. I like to give the ponies personalities, darker sides, attitudes. If I ever do finish one of the many fanfics, you'll see that my version of Ponyland is a rather dark and, at some times, brooding place. It's all part of the individual love of a tou that demanded so much of my childhood.
I don't have any real influences. I originally based my drawings from the original animation; Firefly's Adventure, because, let's face it, that's the best. The animation really, really, deteriorated from there on. The last series, with the seven characters and such, is also a little reflected in my work because, well, I like the idea of ponies walking on hind legs and driving cars. Anthropomorphic ponies offer so much scope. I also am vaguely inspired by anime. I'm not a massive anime fan, but I love the artform and am still trying to pefect anime-style colouring and eyes on MLPs! Midas up there is an example of my attempts.
I used to use 100% Paint Shop Pro 5.0, but now I use both PSP and Adobe Photoshop 5.0. I intend to get Painter someday, but it's so awfully expensive. A lucky Christmas present perhaps? ^_^
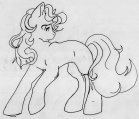
Step One - Sketching the pony
I don't use any special equipment or expensive art-media to draw the
initial pony. There's simply no point for it if I'm going to scan and manipulate
it on the PC. So I take any paper I can lay my hands, on (I usually have
reams and reams of printer paper), and use a normal pencil to sketch out
the basic idea of the pony.
I hate to say it, but yes, I follow the balls and lines approach. As a youngster,
I used to hate reading these 'how to draw' books when they'd go on about
'circles' and 'buckets'. But, alas, that's how I do it now. A MLP face is
exptremely out of proportion, really, for any real pony. The easiest way
to keep in track is to perform the divided circle and hope you got the lines
in the right place. I used to draw foxes and dogs 24 - 7, and have carried
a few tricks along into MLP drawing, such as getting the nose right by drawing
a 'box'.
It's also good to find an original pose. It can be daunting at times, especially
when ponies are so out of proportion, but there's nothing more boring than
the image of a pony just...standing. Pegasi offer a lot of scope, but it's
difficult to remain faithful to the Hasbro 'small wing' approach, if you
want your pegasus to look at all believable. Mine all have 'reasonable' sized
wings.
Step Two - Inking the pony
Now, ink her in. Simple, really. These days, I use a fountain pen.
It's not an expensive one, either, and the ink I'm currently using is, er,
pink. See, it doesn't matter when you're scanning! I use a fountain pen because
the ink flow is nice and steady and neat, and you don't have to press hard
like you would a normal biro, to get a good line. I'd usually use blue or
black but I could only find a pink cartridge. For those wondering, yes, every
image on this site was drawn with the pink ink ^_^ See, it makes no difference.
Then, of course, rub out the lines.
Step Three - Scanning and Cleaning
 I scan using
Paint Shop Pro, for the simple reason that I know how to, and it's easy.
I scan on 100%, at 300 Dpi, and under the 'black and white photo' setting.
This produces a huge image on PSP. It'll be grey, and dingy, and needs some
cleaning before
y
I scan using
Paint Shop Pro, for the simple reason that I know how to, and it's easy.
I scan on 100%, at 300 Dpi, and under the 'black and white photo' setting.
This produces a huge image on PSP. It'll be grey, and dingy, and needs some
cleaning before
y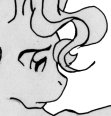 ou can start
to colour it. First, I have to change it from a grey-scale image to a full
colour one (16 million colours; 24 bit). Then I clean it up. Now, to do this,
I now use Adobe 5.0 because it offers a beautifully clean 'flood fill' that
maintains the line quality. The image on the right here shows how clean Adobe
fills around the lines. I've noticed PSP can be be uneven and jagged.. I
make the background white, leaving the grey paper colour inside the lines
of the pony. This helps for later flood filling. Obviously, before you do
this, it pays to make sure all your lines are closed, other wise you will
get flood fill leaking into your original pony image. Always a bad
ou can start
to colour it. First, I have to change it from a grey-scale image to a full
colour one (16 million colours; 24 bit). Then I clean it up. Now, to do this,
I now use Adobe 5.0 because it offers a beautifully clean 'flood fill' that
maintains the line quality. The image on the right here shows how clean Adobe
fills around the lines. I've noticed PSP can be be uneven and jagged.. I
make the background white, leaving the grey paper colour inside the lines
of the pony. This helps for later flood filling. Obviously, before you do
this, it pays to make sure all your lines are closed, other wise you will
get flood fill leaking into your original pony image. Always a bad
 thing! Now,
on my original inking, I made a little mistake on the hoof. All you have
to do to clean this up is select the white background colour, get a small
size paint brush, and go over it. Sometimes it helps to zoom into the image
before you do this. Right, now all the little technical things are out the
way, you can get onto some base colouring. This is always especially fun
if you're creating a custom pony!
thing! Now,
on my original inking, I made a little mistake on the hoof. All you have
to do to clean this up is select the white background colour, get a small
size paint brush, and go over it. Sometimes it helps to zoom into the image
before you do this. Right, now all the little technical things are out the
way, you can get onto some base colouring. This is always especially fun
if you're creating a custom pony!
Step Four - Colouring the pony
This is as simple as flood filling the background. Just make sure
you fill in every knook and cranny. If you draw a highly detauled mane and
tail, it's
 always nice
to but two different shades of the same colour, to add depth and highlight
to it. (Of course, you don't need to do this if dealing with rainbow hair
ponies!)
always nice
to but two different shades of the same colour, to add depth and highlight
to it. (Of course, you don't need to do this if dealing with rainbow hair
ponies!)
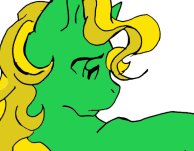
The initial base colouring will look flat but should leave lovely clean lines.
Now, the eye is always a bane of my annoyance, as seen here, because anime-type
eyes aren't closed all around, and the colour leaks. I fix this by drawing
the gaps with white and filling it then. Once you have coloured every little
gap, it's time to have some fun and make her look a little more three
dimensional.
Step Five - Shading, shadows and
highlights.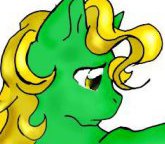
Now, every paint program has 'darken' or 'burn' or 'lighten' or
'highligh' options. This is where these come in handy. Now, it's wise to
know where you want your light to come from. In this case, I haven't really
got a specific light source, so what I do is shade around the outer lines
of the pony, and 'under' anything...this gives the impression of dimension.
Lightening areas that would be
 closer to you
(the tummy, flanks, and middle of the legs). Hopefully the little picture
on the lift will show you what I mean, it isn't very hard to do but can give
the best effects.
closer to you
(the tummy, flanks, and middle of the legs). Hopefully the little picture
on the lift will show you what I mean, it isn't very hard to do but can give
the best effects.
Step Six - Play
Play play play. Manipulate the image, add filters, just get to know
your Painting programs. Backgrounds are something I'm hopeless at, myself,
but since I'm only giving a "how I do it" on the ponies themselves, I'll
leave the backgrounds to you! Enjoy ^_^
